

Post by Admin on Nov 8, 2022 2:01:31 GMT
Installation of the internal gotek kit is pretty straight forward.
First off, this kit is designed to go into the left hand bay (DF1 position) on your Amiga 2000. The reason for this is because the bezel is designed to screw into the same location as the blank that all A2000's came with when they were only equipped with one drive (DF0). There's no reason why you couldn't use this on the right side, however, you'd need to glue the bezel into place as there are no standoffs to screw to on the right side location.
STEP 1:
Start off by removing the DF1: plate (if there is one), or the floppy drive if you have one located in this position. If you have a HD located here, you'll need to relocate that to free up space for your gotek. Install the bezel that came with the kit. There is no top or bottom, just install it with the two factory screws.
STEP 2:
Install the gotek mount onto the floppy drive platform that came with your A2000. That's the plate that the FD on the right side is screwed to. There are two screws on each side that hold it in place. Remove those four screws and remove it from your machine. Now install the gotek bracket with the supplied screws and washer. When you install it, when looking at the front of the bracket (says front on the "front"), the left side of the bracket should be flush with the left edge of the floppy drive platform. You'll also notice that there is a small arrow on each side of the gotek bracket. The point should be right at the front edge of the A2000 floppy mounting platform.
STEP 3: If you're putting your DF0 drive back in, install it tight to the gotek mount you've installed. It's not neccessary to install the two screws on the right side into the gotek, but you may if you want. Just make them lightly snug, don't over tighten otherwise you could break the plastic gotek mount.
STEP 4:
When you re-install the floppy drive platform, ensure it's slid all the way forward, then install and tighten all of the four screws you removed previously.
STEP 5:
Screw the gotek onto the bracket using the screws provided with your gotek. It's sufficient to only use two screws on the left side. Make them snug, don't overtighten, as you could strip the plastic in the gotek and/or crack the 3D printed mount. Snug is all you need.
STEP 6:
Make the electrical/data connections to your gotek and reconnect your DF0 drive if you have one installed.
STEP 7:
Put the cover back on, and re-install the case screws.
Troubleshooting:
If you find the gotek doesn't line up perfectly the first time, you may need to move the gotek mount slightly in the appropriate direction to make it line up. Great pains were taken to ensure a perfect fit first time, however, the computer was a mass manufactured device, and slight variations may have existed. If you find it neccessary, you will find that there is some minor adjustment available to you in the mount to the floppy drive platform. You will need to take note of the direction you need to move it, then reverse the process and make those slight adjustments to fit.
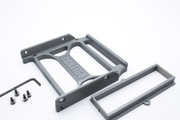
Below are some photos of the kit as well as the kit installed in an Amiga 2000.
Post any questions you may have!
COREi64/admin


First off, this kit is designed to go into the left hand bay (DF1 position) on your Amiga 2000. The reason for this is because the bezel is designed to screw into the same location as the blank that all A2000's came with when they were only equipped with one drive (DF0). There's no reason why you couldn't use this on the right side, however, you'd need to glue the bezel into place as there are no standoffs to screw to on the right side location.
STEP 1:
Start off by removing the DF1: plate (if there is one), or the floppy drive if you have one located in this position. If you have a HD located here, you'll need to relocate that to free up space for your gotek. Install the bezel that came with the kit. There is no top or bottom, just install it with the two factory screws.
STEP 2:
Install the gotek mount onto the floppy drive platform that came with your A2000. That's the plate that the FD on the right side is screwed to. There are two screws on each side that hold it in place. Remove those four screws and remove it from your machine. Now install the gotek bracket with the supplied screws and washer. When you install it, when looking at the front of the bracket (says front on the "front"), the left side of the bracket should be flush with the left edge of the floppy drive platform. You'll also notice that there is a small arrow on each side of the gotek bracket. The point should be right at the front edge of the A2000 floppy mounting platform.
STEP 3: If you're putting your DF0 drive back in, install it tight to the gotek mount you've installed. It's not neccessary to install the two screws on the right side into the gotek, but you may if you want. Just make them lightly snug, don't over tighten otherwise you could break the plastic gotek mount.
STEP 4:
When you re-install the floppy drive platform, ensure it's slid all the way forward, then install and tighten all of the four screws you removed previously.
STEP 5:
Screw the gotek onto the bracket using the screws provided with your gotek. It's sufficient to only use two screws on the left side. Make them snug, don't overtighten, as you could strip the plastic in the gotek and/or crack the 3D printed mount. Snug is all you need.
STEP 6:
Make the electrical/data connections to your gotek and reconnect your DF0 drive if you have one installed.
STEP 7:
Put the cover back on, and re-install the case screws.
Troubleshooting:
If you find the gotek doesn't line up perfectly the first time, you may need to move the gotek mount slightly in the appropriate direction to make it line up. Great pains were taken to ensure a perfect fit first time, however, the computer was a mass manufactured device, and slight variations may have existed. If you find it neccessary, you will find that there is some minor adjustment available to you in the mount to the floppy drive platform. You will need to take note of the direction you need to move it, then reverse the process and make those slight adjustments to fit.
Below are some photos of the kit as well as the kit installed in an Amiga 2000.
Post any questions you may have!
COREi64/admin